Tutorials 4
How to disable automatic updates in WordPress
If you’re running a WordPress site, you might want to consider disabling automatic updates. While it’s important to keep your WordPress installation up to date, automatic updates can sometimes break things. If you’re comfortable with manually updating your WordPress site, then you can disable automatic updates.
Why you might want to disable WordPress automatic updates?
One reason you might want to disable automatic updates in WordPress is if you have a custom site that you’ve spent a lot of time perfecting. If an update to WordPress breaks your site, you’ll have to spend time fixing it, which can be frustrating.
Another reason to disable automatic updates is if you’re running an older version of WordPress. Newer versions of WordPress are often not compatible with older plugins and themes, so you might have to spend time updating those as well.
Disabling automatic updates can also be a good security measure. If you’re not comfortable with WordPress automatically updating itself, you can disable the feature and update WordPress manually when you want to. This way, you can be sure that your site is not facing any version confits.
How to disable automatic updates in WordPress
There are a few different ways that you can disable automatic updates in WordPress. One way is to simply add a line of code to your wp-config.php file. You can add the following line of code to disable all automatic updates:
define( ‘AUTOMATIC_UPDATER_DISABLED’, true );
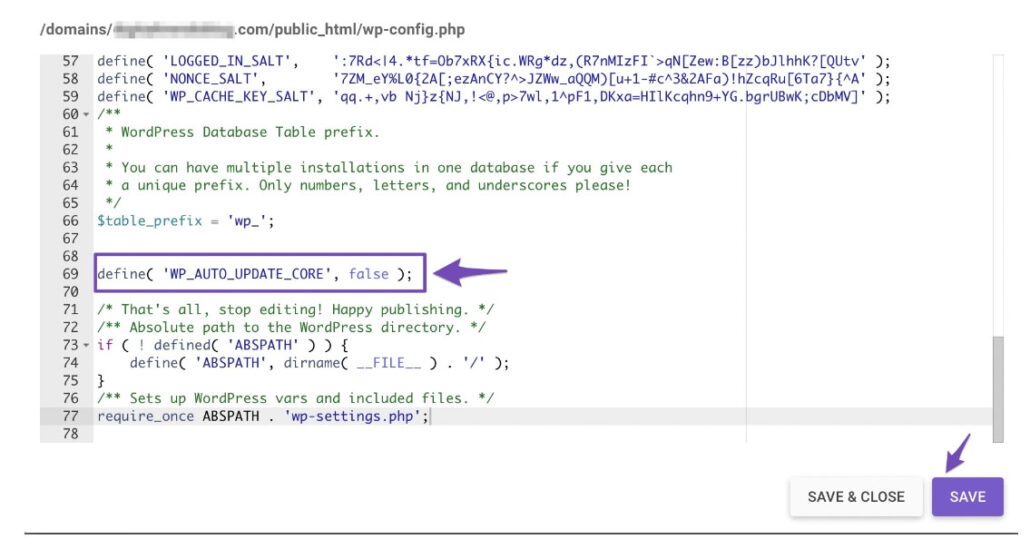
If you only want to disable certain types of updates, you can use the following lines of code instead:
define( ‘WP_AUTO_UPDATE_CORE’, false );
define( ‘AUTOMATIC_UPDATER_DISABLED’, true );
You can also disable automatic updates by installing the Disable Updates Manager plugin or Easy Updates Manager plugin. Once installed and the plugin is activated, navigate to Dashboard > Updates Options to configure the settings.
You can disable automatic updates in WordPress if you want to, but it’s generally not recommended.
You can disable automatic updates in WordPress if you want to, but it’s generally not recommended. Doing so can leave your site vulnerable to security risks and other potential issues. If you do choose to disable automatic updates, be sure to keep your WordPress installation up to date manually.
Google Analytics 4 (GA4) for WordPress Site Kit

As you already know a new version of Google Analytics was introduced in October 2020 that requires the usage of a Google Analytics 4 (GA4) property to track unified web and app analytics. More details on the differences between GA4 and Universal Analytics (UA) are available here.
This article will guide you the ways to upgrade your existing Universal Analytics (UA) to GA4 via the Site Kit WordPress plugin.
Beginning with version 1.36, released on July 7, 2021, Site Kit is adding the ability for users to create and add a GA4 property directly through the Site Kit interface.
Add a Google Analytics 4 property (to a site that already has Analytics)
Steps to set up a Google Analytics 4 property alongside your existing Universal Analytics property
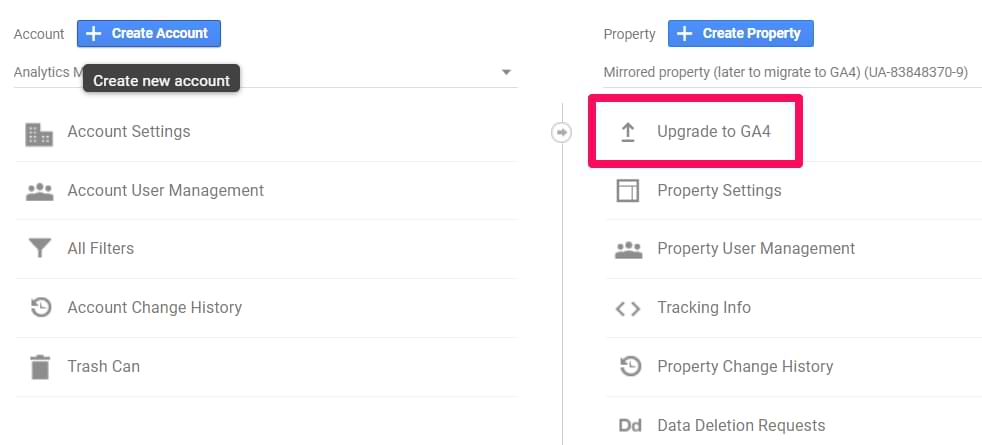
Click GA4 Setup Assistant (instructions below) to create a Google Analytics 4 property that collects data alongside your existing Universal Analytics property. Your Universal Analytics property is left unchanged and continues to collect data — you can always access it via the property selector or Admin screen.
If you use a website builder or CMS-hosted website (for example, WordPress, Shopify, Wix, etc), use your website builder’s/CMS’s custom HTML feature to tag your site. Follow these instructions. Do not simply paste your “G-” or “UA-” ID into the field that your CMS provides.
Follow all the Steps here
Important : https://sitekit.withgoogle.com/documentation/ga4-analytics-property/
Change Global background image in Revolution Slider
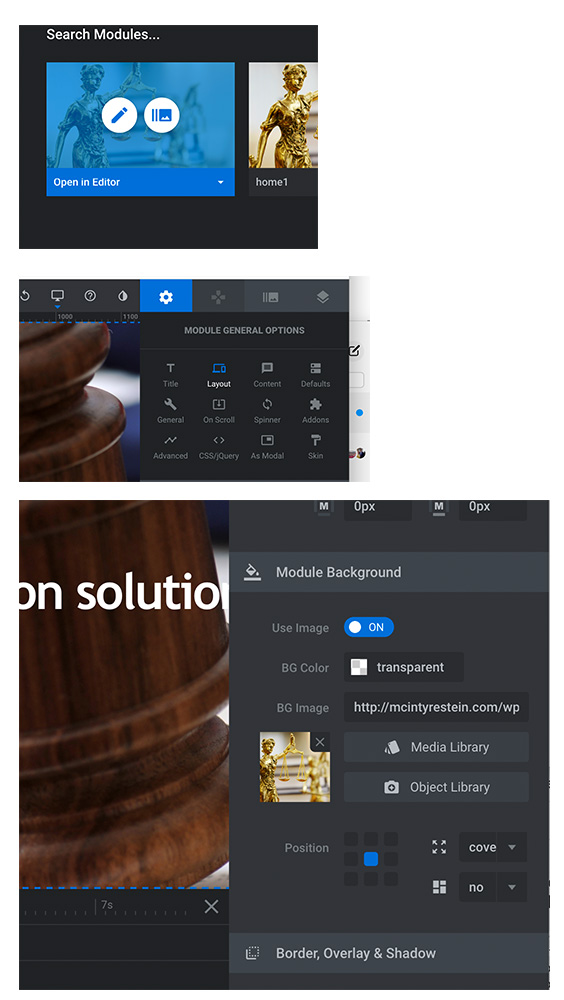
how do you add or update a Global background image or BG Image in Revolution Slider 6. Here are the steps:
In the WordPress Dashboard, go to “Slider Revolution”
- Select “Slide Module”
- When select, hit the pencil icon or “Open Editor”
- Go to the “setting” icon tab in the upper right
- Select “Layout” and Scroll down to “Module Background” in the right
Root directory (htdocs) location – AWS LightSail (Bitnami & WordPress)

If you are new to Amazon AWS Lightsail, You might confused to find the default htdocs location of your website because it is bit deferent than other Linux systems.
So, How to find the root directory on Bitnami (WordPress) on Amazon LightSail?
Navigate using your FTP client as follows,
/opt/bitnami/apps/wordpress/htdocs/
or
/opt/bitnami/wordpress/wp-content
By default all user files are uploaded to /opt/bitnami/wordpress/wp-content

Most viewed